What is the Hughesnet Mesh Wi-Fi Node?

The Hughesnet® Mesh Wi-Fi Node is designed to extend your modem’s Wi-Fi signal, providing seamless wall-to-wall Wi-Fi coverage throughout your home. It pairs effortlessly with the Hughesnet Modem to ensure uninterrupted browsing and streaming in every room.

Do I Need a Mesh Wi-Fi Node?

You may benefit from a Mesh Wi-Fi Node if:

  • You experience weak or no signal in certain areas of your home.
  • You want to extend Wi-Fi coverage to additional structures like garages or guest houses. Use the myHughesnet (Mobile) app’s wireless signal gauge to help you identify places in your home with a poor signal.

How Does It Work?

The Hughesnet Mesh Wi-Fi Node extends your Wi-Fi coverage by repeating signals in weak connectivity areas. It receives signals from the main modem and redistributes them, eliminating dead zones for reliable, consistent coverage throughout your home. To use the Mesh Wi-Fi Node, you’ll need an HT3000W Satellite Modem, an active internet connection, and an electrical outlet near each node.

How Do I Order Mesh Wi-Fi Node?

You can purchase the Hughes Mesh Wi-Fi Node by logging into your account on myhughesnet.com under “Shop” menu.

Will I Need More Than One Mesh Wi-Fi Node?

The number of nodes required depends on:

  • The size and layout of your home
  • The construction materials (e.g., thick walls may require more nodes for optimal coverage)
  • Use the myHughesnet (Mobile) app to detect weak signal areas and determine the number of mesh Wi-Fi nodes needed.

Where Should I Place My Mesh Wi-Fi Node?

For the best performance, place the mesh Wi-Fi node halfway between your Hughesnet modem and the area with poor signal strength. This positioning ensures you get maximum use of your mesh Wi-Fi node.
How to Block or Report Unwanted Emails and Senders?

Hughesnet® email allows you to filter out unwanted emails, such as marketing messages, with two options: “mark as spam” or “block the sender”. This FAQ outlines the steps for both methods.

Marking an Email as Spam

  • Login to your email account via myhughesnet.com.
  • From the inbox, click on the email you want to mark as spam.
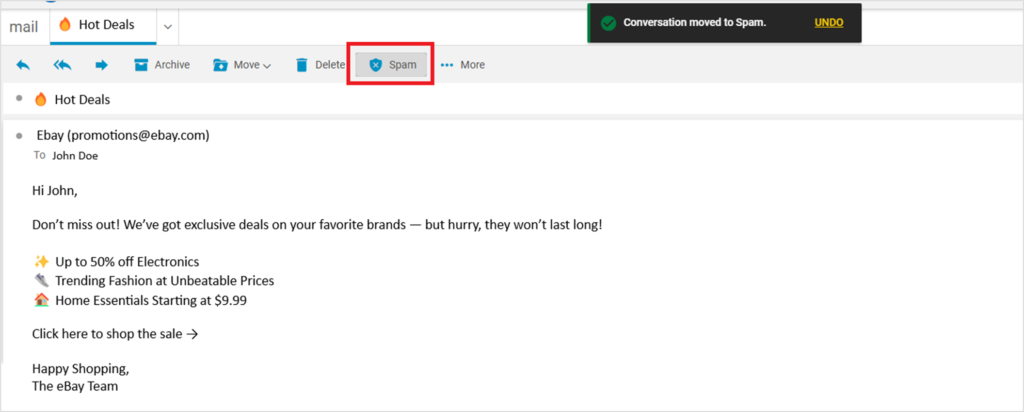
  • On the email, from the top menu select Spam as shown below. You’ll then see a confirmation message saying, Conversation moved to Spam.

Note: Marking an email as spam does not instantly block the sender. These emails would still be sent to your email address and can be found in the Spam Folder.

Marking an Email as Not Spam

  • To mark an email as Not Spam:
    • Go to your Spam folder.
    • Select the email you want to mark as not spam.
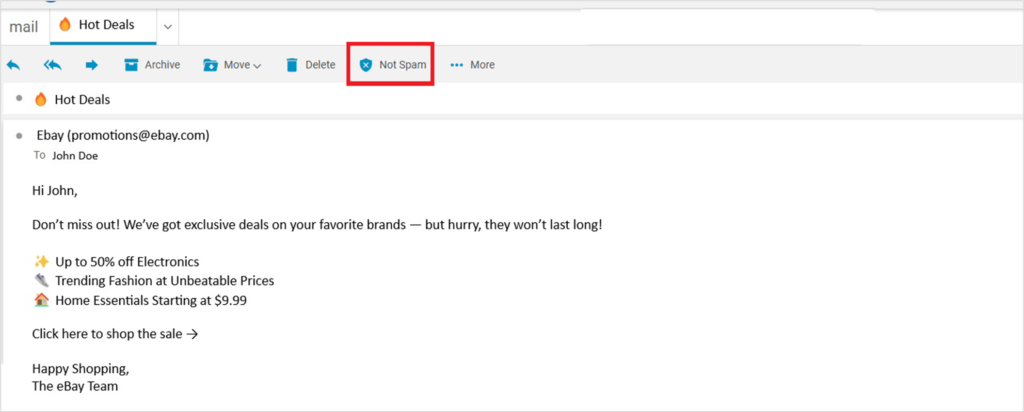
    • Click Not Spam to move the email back to your inbox.
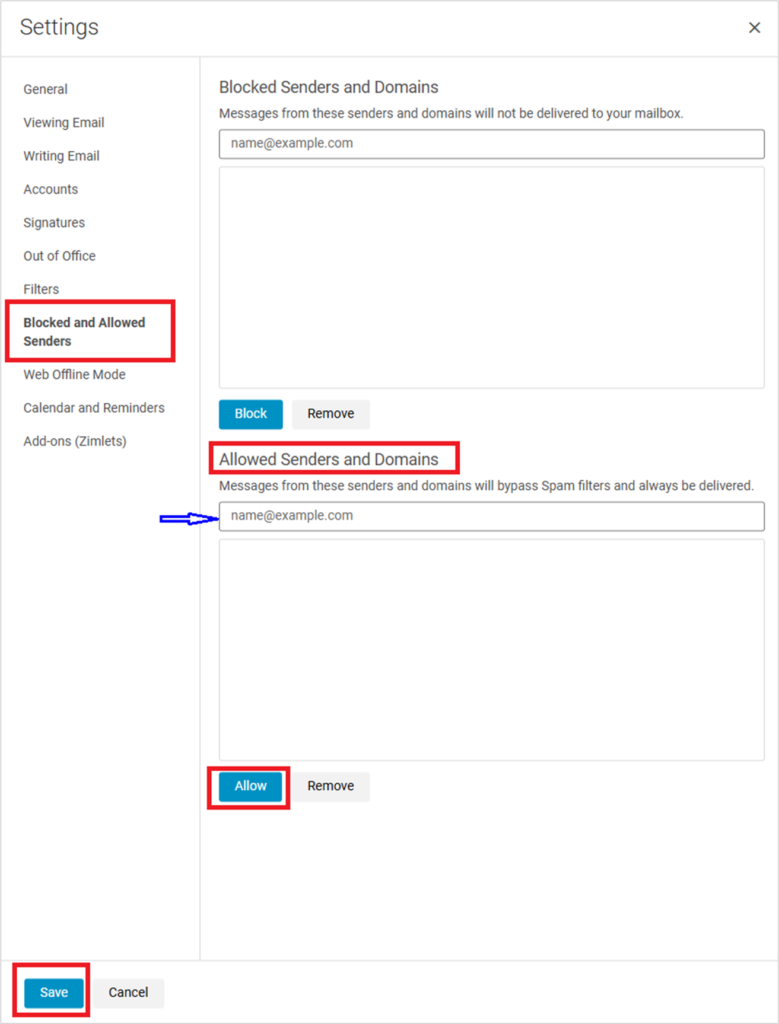
  • Alternatively, if you want to whitelist an email address to prevent its emails from being sent to the spam folder, go to Settings > Blocked and Allowed Senders and add the email address under Allowed Senders and Domains.

Blocking a Sender

  • Login to your email account via myhughesnet.com.
  • From the inbox, open the email from the sender you wish to block.
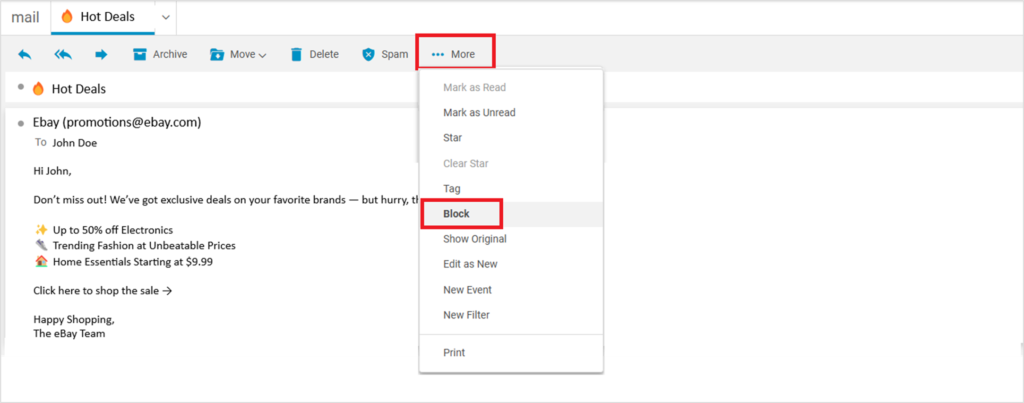
  • Select the More menu (usually represented by three dots).
  • Choose Block from the options.
  • From the pop-up, verify the email address being blocked, select your preferences, and click OK.
    • Depending on your choices, this will delete all existing emails from the sender and block any future emails.

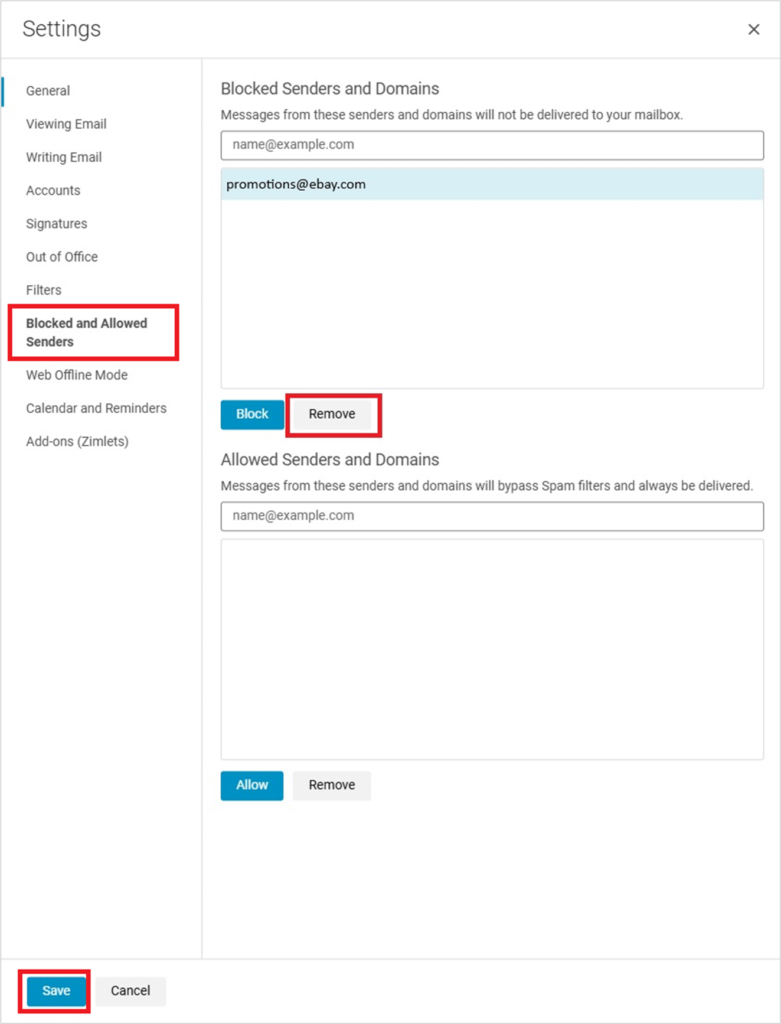
Unblocking a Sender

How to know if your Mesh Wi-Fi Node is synced?

A Mesh Wi-Fi Node is the perfect solution to extend your modem’s signal throughout your home, for wall-to-wall Wi-Fi coverage. Ensuring your Mesh Wi-Fi Node is synced with your Hughesnet® modem, helps you to get the most out of your internet service.

How to check the Sync Status:

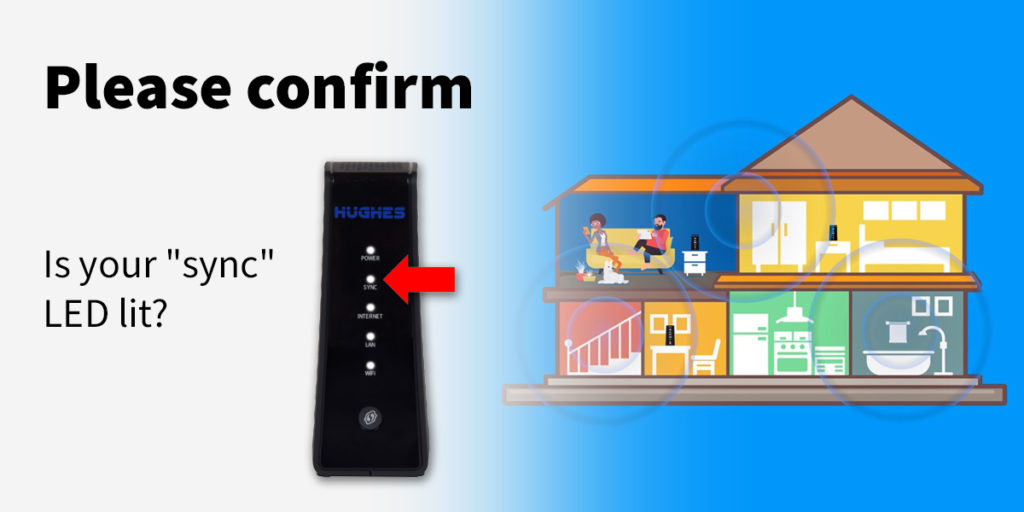
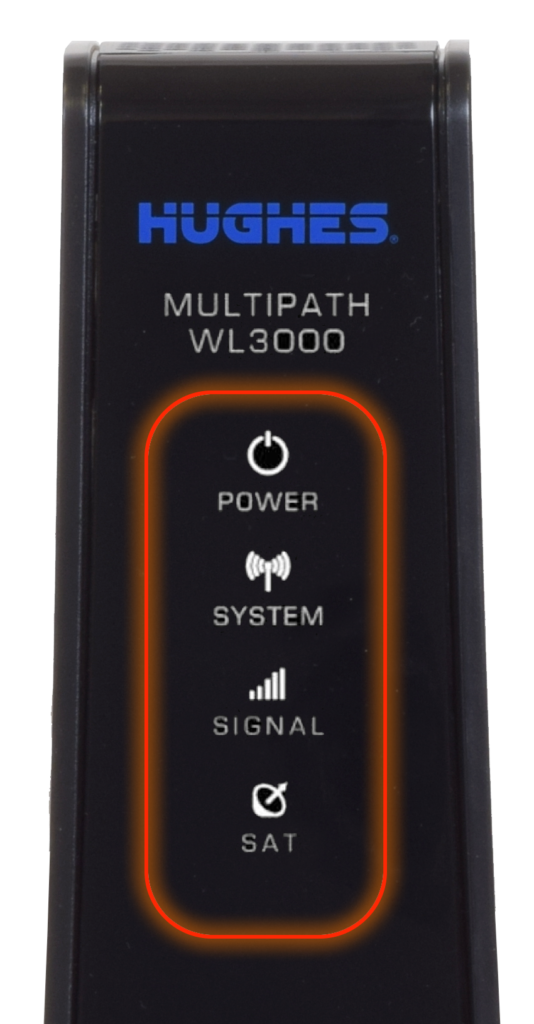
  • Locate the “Sync” LED on your Mesh Wi-Fi Node. It should be the second LED from top (as shown in the picture below).
    • If it is solid lit, your Mesh Wi-Fi Node is correctly synced with your Hughesnet modem and is placed within range from your Hughesnet modem.
    • If it is not lit or blinking, please follow the instructions below to sync your Mesh Wi-Fi Node:
    • Power off the Mesh Wi-Fi Node, wait for 10 seconds, and then power it back on. Check the sync status again after the restart.
    • Bring the Mesh Wi-Fi Node closer to the Hughesnet modem (ideally halfway between your Hughesnet modem and an area with weak signal) and ensure it is properly ventilated, in an upright position, at least six feet away from other electronics like microwave.
    • If the above steps do not fix the issue, please click here to reinstall the Mesh Wi-Fi Node.
    • If none of the above steps work, contact Hughesnet customer support at 866-347-3292, available 24/7 for further assistance.

Does Hughesnet Support 911 Services, and How Do I Update My Address?

The following FAQ applies to Hughesnet® voice subscribers only. Hughesnet voice supports the latest E-911 capabilities.

  • Enhanced 911 (E911) is a system that automatically provides your phone number and registered address to emergency dispatchers when you call 911. It ensures that emergency services can quickly locate you, even if you are unable to speak.
  • Your E911 address tells first responders where to go in an emergency. If your E911 address is incorrect or missing, your call may be misrouted, delaying emergency response, and requiring you to verbally provide your location.
  • Contact your local E911 addressing authority:
    • Utility Companies & Post Office (USPS) –
      The USPS Address Lookup tool can confirm if your address is recognized for mail delivery (USPS Lookup Tool), but E911 addresses may differ from mailing addresses.
    • County or Municipal E911 Addressing Office –
      Many counties and cities have a 911 Addressing Office responsible for assigning and verifying addresses. Check your county’s website or call the local government office.
    • Fire Department or Police Department (Non-Emergency Line) –
      Some local fire and police departments maintain E911 address records or can direct you to the correct agency.
  • Once you have your correct address, you can contact a Customer Care representative at 866-347-3292, available 24/7, to update it on your account.
  • You must update your E911 address whenever you move. VoIP services do not automatically update your location, so it’s important to manually change it.

How Do I Reset My Hughesnet Voice’s Voicemail PIN to default?

Hughesnet® Voice service includes a variety of features our customers love. To learn more about the different features, click here.

The following FAQ outlines the steps you can take to reset your Voicemail PIN that was previously setup. Please note that you need to order and activate your Hughesnet Voice service to manage your Hughesnet Voice features.

  • Register/login to myhughesnet.com.
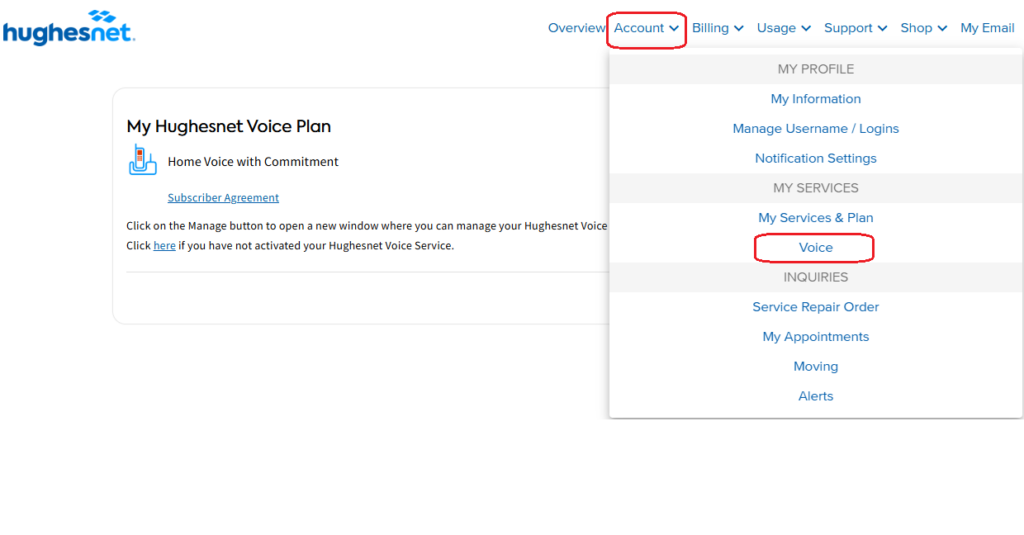
  • Click on the ‘Account’ from the top menu, then ‘Voice’ to visit ‘My Hughesnet Voice Plan’ page.
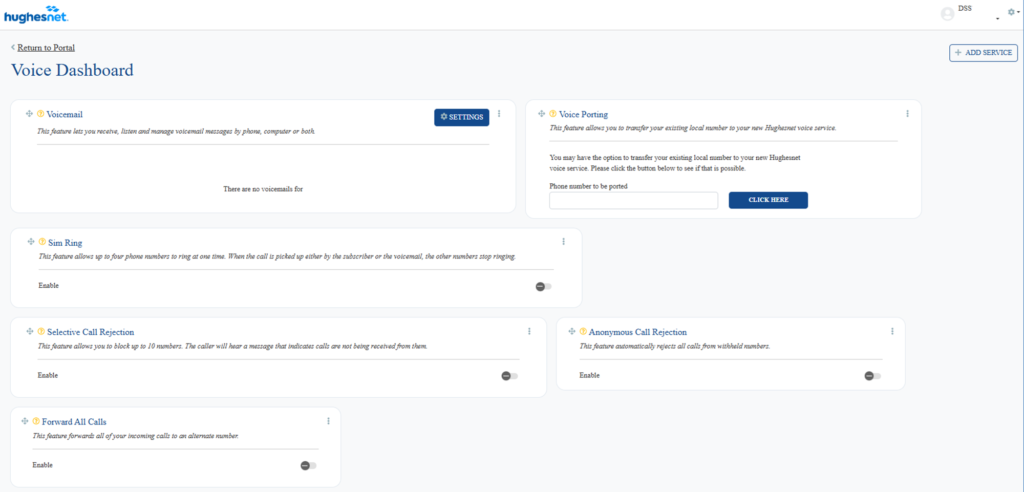
  • On the My Hughesnet Voice Plan page, click ‘Manage’ to visit the ‘Voice Dashboard’.
  • Once you are in the Hughesnet Voice Dashboard, you will be able to access/manage your Hughesnet Voice features like Sim Ring, Call Rejection, Call Forwarding, Voicemail Settings.
  • On the Hughesnet Voice Dashboard, click on the ‘Settings’ button from the ‘Voicemail’ widget as shown in the picture below.
  • In the ‘Voicemail Settings’ pop-up, toggle the ‘Reset Voicemail PIN’ setting to ‘ON’ at the bottom. Press ‘Save Settings’ to reset your PIN to the default value. You will then see confirmation message that the PIN has been reset.

Note: If you would like to change any voicemail settings other than the voicemail PIN reset, ensure that the reset toggle is OFF, so you are not resetting your voicemail PIN.

  • After resetting your PIN, follow these instructions to set a new one of your choice.
    • Dial *333 on the phone you are using with Hughesnet Voice service.
    • When prompted to enter your PIN, enter 1234 (the default PIN you reset to).
    • You will then be prompted to create a new pin. Follow the voice prompt instructions to setup a new PIN.

Priority Data Token Promo OCT 2024

Double Your Priority Data Now

Your Priority Data is always prioritized ahead of Standard Data* on the network so that you can do it all with faster speeds even during high-traffic periods. 

To add more Priority Data to your service plan, we offer Priority Data Tokens in different sizes to suit your needs. For a limited time, get more data for your dollar. Take advantage of this BOGO* any token offer and stock up today to ensure you don’t slow down! 

Priority Data Tokens don’t expire and will remain available on your account until used. Click the button below to get your Priority Data Tokens today. 

Allow up to 5 days for additional Data Tokens to be applied to your account (limit 3 per SAN). Offer valid thru 10/31/24

Data Token Promo October 2024

Life in the Fast Lane!

There are times in life when you want to be in the fast lane, and your time on the internet is one of them! Data Tokens help you stay connected at full speed and give you additional data you need, when you need it!

For a limited time, get more data for your dollar. Take advantage of this BOGO* any token offer and stock up today to ensure you don’t slow down! 

Data Tokens don’t expire and will remain available on your account until used. Get your Data Tokens today.

Allow up to 5 days for additional Data Tokens to be applied to your account (limit 3 per SAN). Offer valid thru 10/31/24

What to do if my Hughesnet modem state code is 102.6.2?

Ensuring your Hughesnet equipment functions properly is essential for maintaining optimal performance.

Verify the issue:

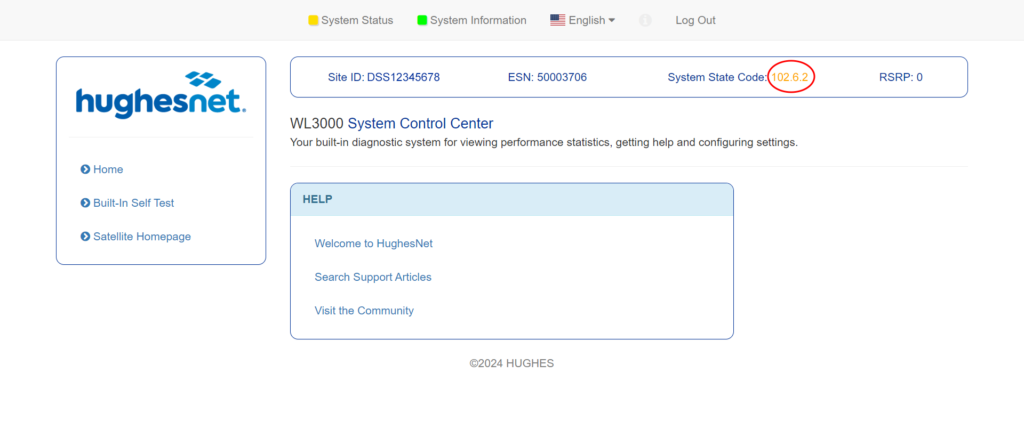
  1. Visit systemcontrolcenter.com from a device connected to your modem.
  2. If the state code displayed is 102.6.2, please continue with the troubleshooting steps below.
Status: 102.6.2 – Issue Detected, Troubleshooting Required 

Troubleshooting steps (if state code is 102.6.2):

  • Step 1 – Unplug the Devices from power supply: Disconnect the power adapters from both your Hughesnet modem and the Multipath device (WL3100) to prevent the risk of a short circuit or electric shock.
  • Step 2 – Remove the SIM Card: Eject the SIM card by gently pressing it inward from the back of the multipath device until it pops out.
Fig: Back of Multipath (WL3100) indicating the SIM slot
  • Step 3 – Reinsert the SIM Card: Carefully take out the SIM card and then reinsert it. A “click” sound will confirm that the SIM card is properly secured.
Fig: SIM card being reinserted
  • Step 4 – Reconnect the Power Supply: Plug the modem and the multipath device back into the power supply. Please wait for the devices to completely turn ON (usually takes a couple of minutes). Once powered ON, all LEDs on the multipath device should illuminate steadily.
Fig: Front panel of Multipath (WL3100) with steady lights
  • Step 5 – Confirm the issue: Using a device connected to your Hughesnet modem, visit systemcontrolcenter.com and check the state code.
    • If the state code is still 102.6.2, please call Hughesnet Customer Support.
    • If the state code is 0.0.0 or 24.1.1, the issue is resolved.